Perilymph sampling is straightforward if done correctly, but extremely difficult if you have never tried it.
The people at Turner know how to do it right!
If you need help with the method, or if you want the sampling to be performed by the experienced staff at Turner then just give them a call - at (217) 602-0306 or email This email address is being protected from spambots. You need JavaScript enabled to view it.
In general, perilymph cannot be collected by the "old" method of inserting a pipette through the round window membrane or by fenestrating the bone in the basal turn of scala tympani (ST). There are many older publications where this was done, and the data generated are virtually useless. When collected in this way, the majority of the sample collected is CSF, not perilymph. This is because the cochlear aqueduct enters ST at the very basal tip. When the ear is perforated, or a sample is withdrawn, CSF comes flooding in. Salt et al. (2003) showed that a 10 μL sample taken through the round window of guinea pigs contained only 15% perilymph, with the remainder of the sample being CSF.
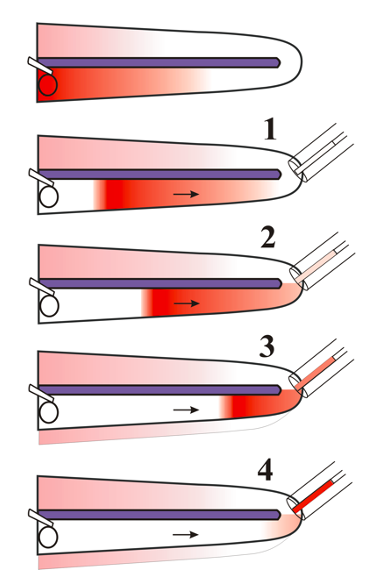
Instead, with apical sampling we use the known entry of CSF to our advantage. When the cochlear apex is perforated, CSF also starts entering ST in the basal turn, in this case now pushing perilymph apically along ST, driving it out of the apex where it is easily collected. The initial samples (assuming 1 uL samples are taken repeatedly) are pure perilymph, originating in different parts of ST. Later samples (above ~ 5 uL) will contain CSF that has passed through ST. If multiple small (1 uL) samples are collected, gradients of drugs along ST can be quantified (Mynatt, et al. 2006)). A schematic of the sequence of events during the collection of 4 separate 1 uL samples from the apex is shown below. Note how when drug is primarily located at the base of the cochlea, concentration will be highest around sample 4.
Sampling Technique
The goal is to build a cup of hydrophobic silicone glue around the apex of the cochlea so that no fluid is lost during collection of a sample.
1) Remove Mucous Membranes and dry the bone at apex
![]()
After opening the bulla, remove the mucous membranes from the apical end of the cochlea with a micro cotton bud (cotton twisted around a serrated wire) or twisted paper tissue (Kleenex or Kimwipe). Allow the bone to dry. Keep the entire exposure as dry as possible because the adhesives do not adhere to wet areas.
2) Apply cyanoacrylate glue to the apex
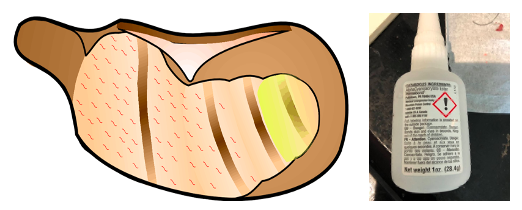
After the area is dry, apply a small amount (one small drop) of thin cyanoacrylate (CA) glue to the cleaned area of the cochlear apex. The CA glue must be the thin type (we use Permbond 101), or the thin CA available in hobby stores. Typical tubes of "superglue" are too thick, which makes the fenestration difficult and more likely the glue will be detached from the apex. After the drop is applied, use a polyethylene spreader (any flat piece of plastic) to move as much glue as possible away from the apex, so that the glue layer is thin.
3) Apply two-part silicone adhesive around the cochlear apex
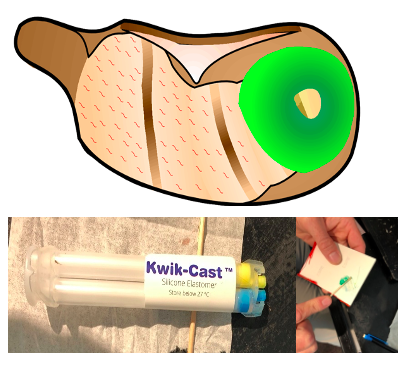
Small amounts of silicone are applied at a time. WPI’s (World Precision Instruments, WPI, Sarasota FL) Kwik-Cast silicone comes in a two part syringe with a mixing head. Do not use the mixing head as it wastes too much. Split the back of the plunger so that the two components can be ejected separately. Keeping the tip clean to avoid mixing, eject small amounts of the silicone (yellow) and hardener (blue) on to a plastic mixing sheet. First apply a ball of silicone to the apex with a dental point and spread it away from the site where the fenestra will be made. This should leave a silicone do-nut with thin adhesive in the middle. Then add extra layers to the outside of the donut. The entire bulla under the apex can be filled if desired. With repeated applications form a cup around the apex of the cochlea so that fluid emerging cannot reach the bulla. Do this in 3-4 separate applications of silicone. You should be able to leave enough clear area at the apex to see landmarks necessary to make an outlet in the correct location, but the area you will be perforating should be completely encircled by silicone glue.
4) Fenestrate the Apex
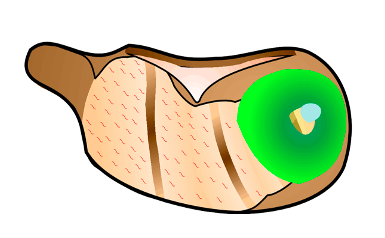
A Storz N1705 80, 1/3mm 30 degree oval window pick is used to make a 50 - 100 um diameter fenestra in the apical end of the cochlea, in the middle of the silicone ring. We make this fenestra on the medioventral surface of the apical turn, at a “safe distance” from stria vascularis. This location places the fenestra in the apical part of scala vestibuli, close to the helicotrema. As you are developing the technique, it is a good idea to remove the adhesives after you have finished taking the fluid sample, to verify that the fenestra location was well clear of scala media. As soon as the apex is perforated, fluid will start coming out and should accumulate as a “bead” on the silicone. Therefore, make sure you have your sample micropipet close at hand before making the fenestra. The pick is repeatedly scraped on the bone in different directions, forming a depression in the bone. Do not push on the pick. Just keep scraping on the location until fluid emerges. Finally, put the pick into the fenestra and roll it slightly side to side to enlarge the hole.
5) Collect the Sample(s)

As soon as the fenestra is made, collect the sample(s) using calibrated capillary VWR catalog # 53432-728 10 µL or Drummond 2-000-005 5 µL micropipettes. Do this by holding the capillary by hand against the apex so that fluid is drawn into it. Be careful not to touch any other fluid in the bulla as you position the tip over the apex. The sample usually comes out at a rate faster than 1 µL / minute. The time to get a 1 µL sample is usually around 30-40 sec and to get a 10 uL sample takes 7-10 min. Holding the capillary for this period can get tiring, so the pipette can periodically be removed briefly while you re-adjust your grip. In most experiments 10 x 1 µL samples are collected allowing perilymph gradients to be quantified. In some experiments, a single 5 µL sample is collected, representing most of the perilymph in scala tympani. If larger samples are collected it should be emphasized that the sample will NOT ALL BE PERILYMPH. It will consist of approximately 5 µL of ST with the balance being CSF that has “washed through” ST.
6) Handling Samples
The exact volume of each sample is determined by measuring the fluid length in the capillary immediately after the sample is obtained. This done with a calibrated dissecting scope with a reticule in the eyepiece. Based on the length to the calibrated line on the capillary, the volume of smaller samples can be accurately calculated. A scaling factor, to convert sample length in the capillary in reticule units to volume in µL is built into the dilution spreadsheets we use.
Samples are then expelled into a dilutent and the pipette is rinsed internally with dilutent to ensure that all solutes are washed from the pipette.
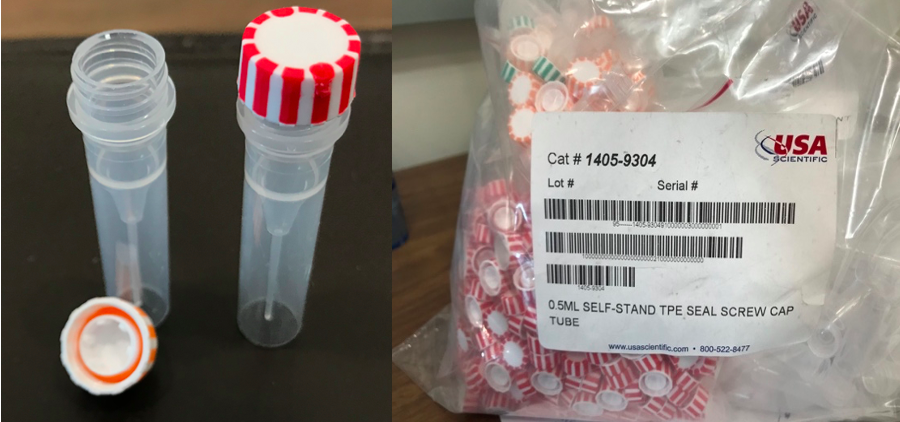
Samples are diluted, stored and shipped in 0.5 µL polyethylene vials with screw top caps that have silicone gaskets (the orange ring in the picture of the cap above). The dilutent composition and volume depends on the analysis being performed. The dilutent may be PBS, PBS with azide, acetonitrile/water mix, methanol/water mix. The dilutent volume varies from a minimum of ~25 µL up to ~150 µL.
Dilution is performed by first putting the specified volume of dilutent into a vial. The sample pipette is connected to the tubing that comes with the pipettes, using a 1 mL syringe instead of the mouthpiece to control pressure. Before connecting to the sample pipette the syringe is half-filled with air. The sample pipette is connected to the tubing and its tip lowered to make contact with the dilutent. SLIGHT pressure is applied from the syringe to expel the sample but not so much as to create a mass of bubbles. Pressure is then reduced slightly to allow dilutent to be drawn into the capillary, reaching about twice the volume of the original sample. The dilutent is expelled by slight pressure and the process repeated a second time to wash the inside of the capillary with dilutent.
The vial is capped tightly and stored at -75 to -80 until shipment for analysis on dry ice.
A more complete version of these instructions are available for the asking from:

The people at Turner Scientific can help you design the project, can perform the sampling if you need it and can help you interpret the data (with the FluidSim program if necessary). If you think you need help then contact Turner at (217) 602-0306 or by email at This email address is being protected from spambots. You need JavaScript enabled to view it..
References
Mynatt R, Hale SA, Gill RM, Plontke SK, Salt AN. Demonstration of a longitudinal concentration gradient along scala tympani by sequential sampling of perilymph from the cochlear apex. J Assoc Res Otolaryngol. 2006; 7:182-193.
Salt, A.N., Kellner, C., Hale, S. Contamination of perilymph sampled from the basal cochlea turn with cerebrospinal fluid. Hearing Research 182, 24-33, 2003.